Assemblies
An assembly is a recipe — a bigger thing you build out of the inventory items you already track. Tell the app what parts go into it and how many, and it works out how many you can build, what each one costs, and which part is holding you back.
Open your dashboardWhy assemblies exist
Most operations don’t just buy and sell single items — they combine them. A gift basket is made of products. A finished birdhouse is made of wood, screws and paint. A catering tray is made of ingredients. You don’t want to track the basket’s stock by hand and the stock of everything inside it — they’d drift out of sync immediately.
Assemblies solve that. You define the recipe once, and the app answers the questions that actually matter: “How many can I make right now?” and “What does one cost me to build?” — always based on the live counts of the underlying parts.
The mental model: assemblies sit on top of inventory
This is the part that trips people up, so it’s worth saying plainly: an assembly is not a new pile of stock. It has no count of its own. It is purely a calculation over the inventory items it’s built from. Change the stock of a part, and every assembly that uses that part updates automatically.
The columns you’ll see
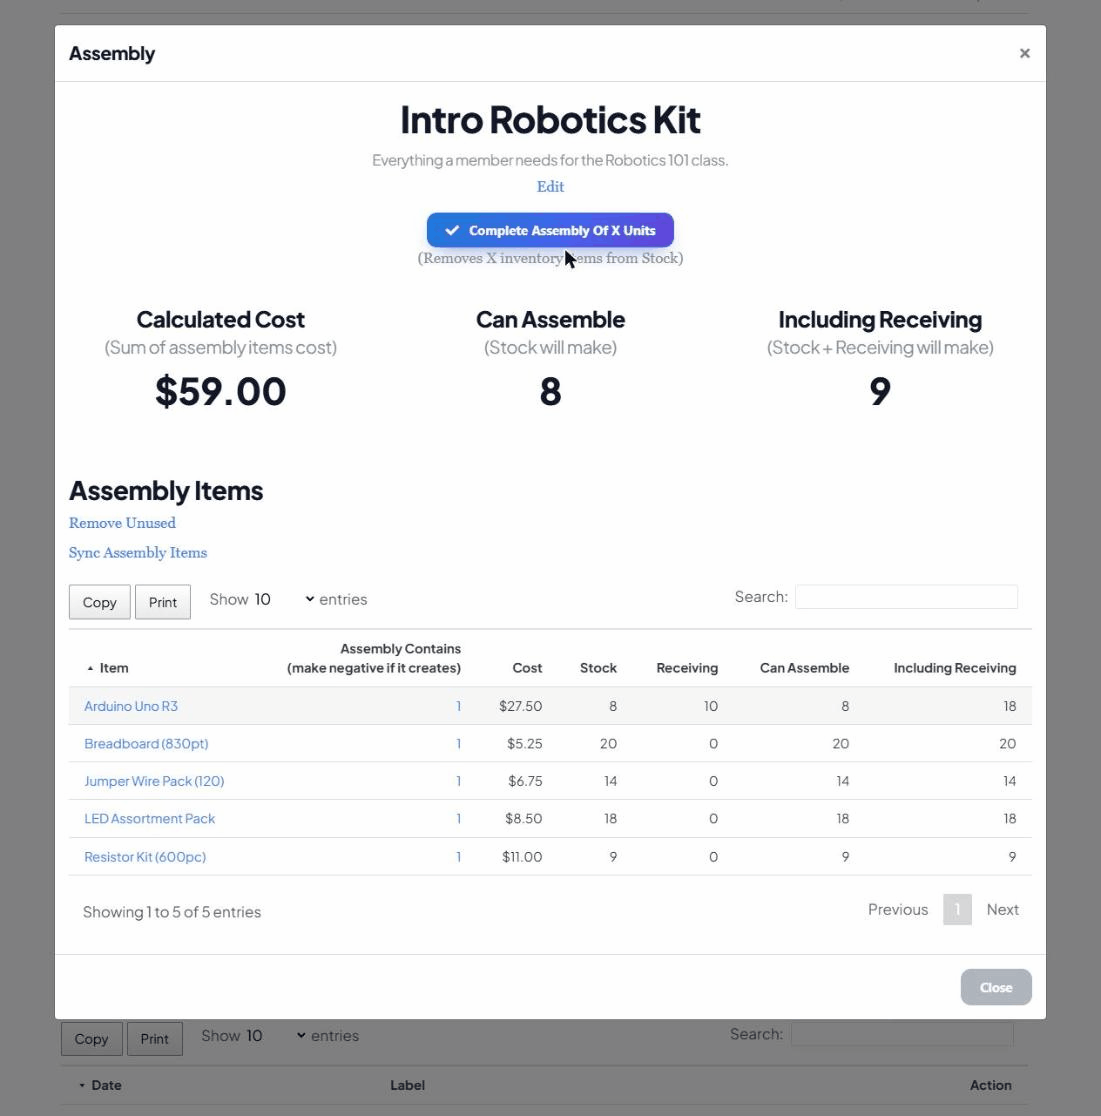
In the Assemblies list and on each assembly, the app shows four calculated figures:
- Calculated Cost — what one assembly costs to build, added up from its parts: for each component, (quantity needed × that item’s unit value), summed together.
- Can Assemble — how many complete assemblies you could build right now from the Stock you have on hand.
- Including Receiving — how many you could build if everything currently on order also arrived (Stock + on-order).
A worked example
Say you sell a Deluxe Gift Box assembly that contains:
- 1 × Box — you have 40 in stock
- 3 × Chocolate Bar — you have 50 in stock
- 2 × Greeting Card — you have 12 in stock
The app does the math per part:
- Box: 40 ÷ 1 = 40 possible
- Chocolate Bar: 50 ÷ 3 = 16.6 → 16 possible
- Greeting Card: 12 ÷ 2 = 6 possible
Can Assemble = 6, because the greeting cards run out first. If a card costs $0.50, a bar $1.00 and a box $2.00, the Calculated Cost of one box is (1×$2.00) + (3×$1.00) + (2×$0.50) = $6.00. That instantly tells you the bottleneck (buy more cards) and your build cost.
Building an assembly — step by step
- Make sure the parts already exist in Inventory. An assembly can only be built from items you already track.
- In the Assemblies section, click New Assembly, give it a name (e.g. “Deluxe Gift Box”), add notes if useful, and Save.
- Open the assembly and look at Assembly Items — this is the recipe.
- Click Sync Assembly Items. This pulls your inventory list into the recipe so every item appears as a row you can set a quantity on. (You only need to do this when you’ve added new inventory items you want available here.)
- For each part the recipe needs, click the number in the Assembly Contains column and set how many of that item one assembly uses.
- Click Remove Unused to clear out the rows you left at 0, keeping the recipe tidy.
As soon as quantities are set, Calculated Cost, Can Assemble and Including Receiving fill in automatically — and each component row also shows its own stock, on-order, and how many assemblies that part alone could support, so the bottleneck is easy to spot.
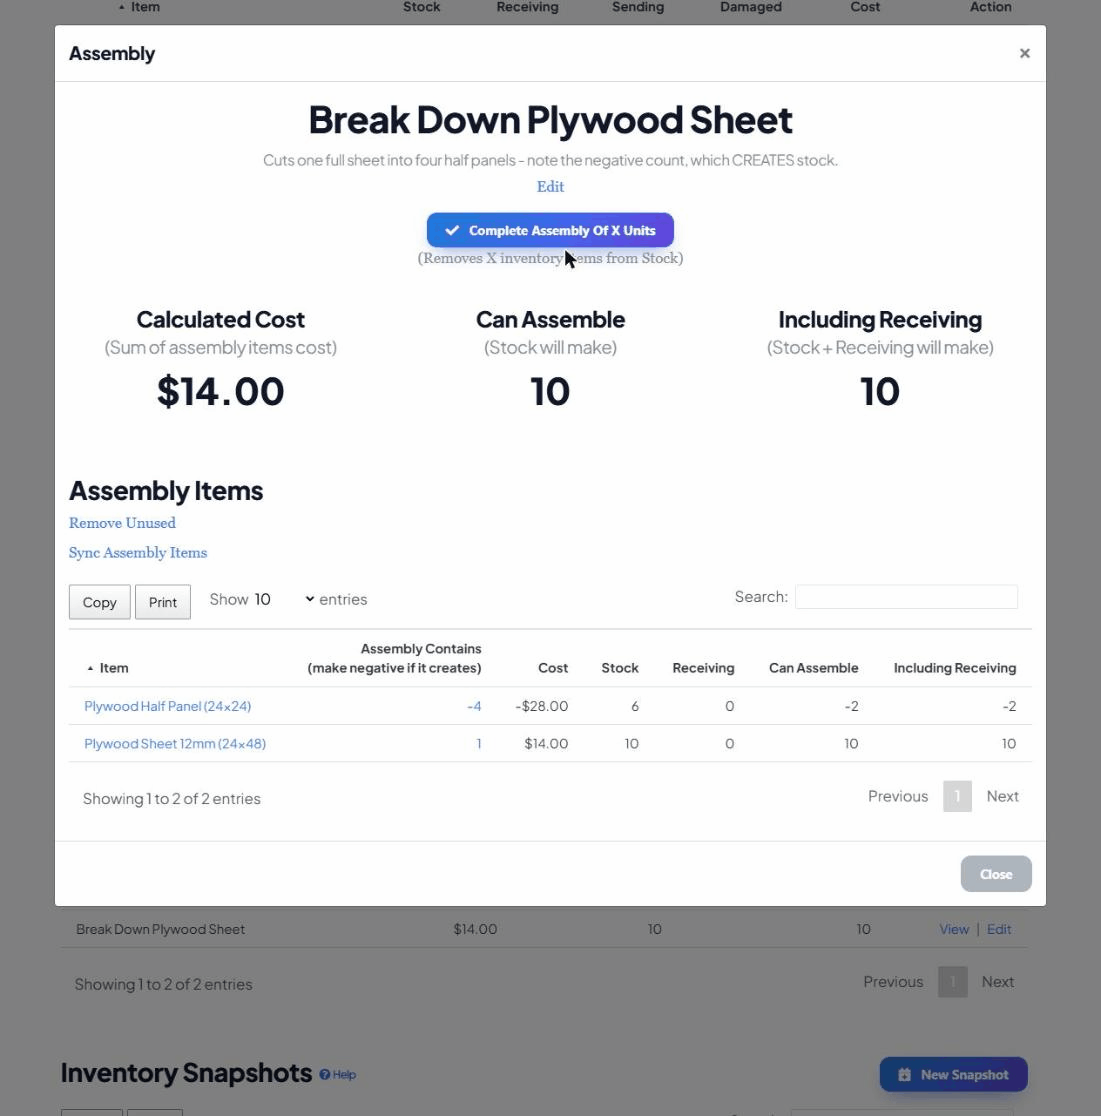
“Make negative if it creates” — the powerful trick
The Assembly Contains column accepts negative numbers, and this is one of the most useful (and most overlooked) features. A normal, positive quantity means the assembly consumes that part. A negative quantity means building the assembly creates that item.
That lets you model processes that produce outputs or by-products, not just consume inputs. For example, a “Cut Plywood Sheet” assembly might consume 1 × Full Sheet (count 1) and produce 4 × Half Panel (count −4). When you complete it, the full sheet is deducted and the half panels are added — all in one step.
Completing an assembly (consuming the parts)
When you actually build some, open the assembly and click Complete Assembly Of X Units. Enter how many you built. The app then walks the recipe and adjusts your inventory in one go:
- For each positive component, it subtracts (quantity × units built) from that item’s Stock.
- For each negative component, it adds the created items to Stock instead.
- Every adjustment is written to each item’s History, so the build is fully traceable.
Keeping an assembly accurate over time
- Sync Assembly Items again after you add new inventory items you want to include in this recipe.
- Remove Unused any time the component list gets cluttered with 0-quantity rows.
- Costs update on their own — change a part’s unit value in Inventory and every assembly that uses it re-totals automatically.
Common questions
Can an assembly contain another assembly? Recipes are built from inventory items, not from other assemblies. If you have sub-builds, track the sub-build’s output as an inventory item (using the negative-quantity trick above), then use that item in the bigger recipe.
Why is “Can Assemble” lower than I expect? It’s capped by your scarcest part. Open the assembly and scan the per-component “Can Assemble” column to find the one part dragging the number down.
Why is a part not in the recipe? It either hasn’t been synced in yet (click Sync Assembly Items) or its quantity is 0. Set a quantity to include it.